UNIGATE® Scan (English): Unterschied zwischen den Versionen
Zur Navigation springen
Zur Suche springen
Reith (Diskussion | Beiträge) |
Biegel (Diskussion | Beiträge) K |
||
| (13 dazwischenliegende Versionen von 3 Benutzern werden nicht angezeigt) | |||
| Zeile 1: | Zeile 1: | ||
| − | [[Datei: | + | [[Datei:UNIGATEScan.jpg|thumb|UNIGATE® Scan]] |
| − | With UNIGATE® Scan | + | With UNIGATE® Scan UNIGATE® Fast-Ethernet devices from firmware-version V5.31 can be displayed, which are located in the previously selected IP-adress-range. In addition an IP-adress can be assigned to temporary or permanent. |
| + | |||
== Scan-function == | == Scan-function == | ||
Please find described below how to find UNIGATE® Fast-Ethernet devices: | Please find described below how to find UNIGATE® Fast-Ethernet devices: | ||
| − | ''Note'': UNIGATE® Fast-Ethernet devices can be either in ''' | + | ''Note'': UNIGATE® Fast-Ethernet devices can be either in '''Konfigmode''' or in '''Run-Mode'''. Only one of the 4 communication channels must not be occupied so that UNIGATE® Scan can be used. '''Attention:''' If the transport-protocol Modbus TCP of ''Universalscript Deutschmann'' is used, then an UNIGATE® Fast-Ethernet device can '''only''' be scanned in '''Konfigmode'''. |
| − | #Install | + | #Install UNIGATE® Scan and start. |
| − | #Through the selection box under '''"Adapter IP"''' are displayed all IP address ranges of the Ethernet Adapters existing on the computer.Here the desired IP address range must be selected for the scan operation. | + | #Through the selection box under '''"Adapter IP"''' are displayed all IP address ranges of the Ethernet Adapters existing on the computer. Here the desired IP address range must be selected for the scan operation. |
| − | #The search process is started by button '''"Scan"'''. All UNIGATE® Fast-Ethernet devices, that are in the prevoiusly selected IP-address-range are now displayed with the MAC address, IP address, type code and software revision. | + | #The search process is started by button '''"Scan"'''. All UNIGATE® Fast-Ethernet devices, that are in the prevoiusly selected IP-address-range are now displayed with the MAC address, IP address, type code and software revision. Depending on the firmware version, other parameters are also displayed. |
| − | #Now an UNIGATE® Fast-Ethernet device can be marked with which the flash test or a change | + | #Now an UNIGATE® Fast-Ethernet device can be marked with which the flash test or a properties change should be done. |
| − | #Via the button '''"Blink"''' the flash | + | #Via the button '''"Blink"''' the flash function is executed. The '''Bus State LED''' flashes for about 5 seconds. This is for checking if the marked UNIGATE® Fast-Ethernet device is really the correct one. |
| − | #Is the correct UNIGATE® Fast-Ethernet device marked, | + | #Is the correct UNIGATE® Fast-Ethernet device marked, the device properties can be changed and saved with the button '''"Save Changes"'''. |
| − | + | #Finally the UNIGATE® Fast-Ethernet device should be restarted. Depending on the firmware version it is possible to use the button '''"Restart"''' for this. | |
| − | # | + | #A new scan can be made to check whether the previously transmitted values have been set correctly. |
#Done. | #Done. | ||
== Weblinks == | == Weblinks == | ||
| − | [ | + | [https://www.deutschmann.de/downloads//Software/Tools/UNIGATE%20Scan/Setup_UNIGATE%20Scan_2.0.0.0.exe UNIGATE® Scan] |
Aktuelle Version vom 2. Juni 2021, 13:35 Uhr
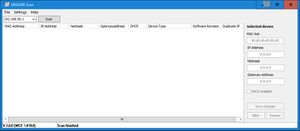
With UNIGATE® Scan UNIGATE® Fast-Ethernet devices from firmware-version V5.31 can be displayed, which are located in the previously selected IP-adress-range. In addition an IP-adress can be assigned to temporary or permanent.
Scan-function
Please find described below how to find UNIGATE® Fast-Ethernet devices: Note: UNIGATE® Fast-Ethernet devices can be either in Konfigmode or in Run-Mode. Only one of the 4 communication channels must not be occupied so that UNIGATE® Scan can be used. Attention: If the transport-protocol Modbus TCP of Universalscript Deutschmann is used, then an UNIGATE® Fast-Ethernet device can only be scanned in Konfigmode.
- Install UNIGATE® Scan and start.
- Through the selection box under "Adapter IP" are displayed all IP address ranges of the Ethernet Adapters existing on the computer. Here the desired IP address range must be selected for the scan operation.
- The search process is started by button "Scan". All UNIGATE® Fast-Ethernet devices, that are in the prevoiusly selected IP-address-range are now displayed with the MAC address, IP address, type code and software revision. Depending on the firmware version, other parameters are also displayed.
- Now an UNIGATE® Fast-Ethernet device can be marked with which the flash test or a properties change should be done.
- Via the button "Blink" the flash function is executed. The Bus State LED flashes for about 5 seconds. This is for checking if the marked UNIGATE® Fast-Ethernet device is really the correct one.
- Is the correct UNIGATE® Fast-Ethernet device marked, the device properties can be changed and saved with the button "Save Changes".
- Finally the UNIGATE® Fast-Ethernet device should be restarted. Depending on the firmware version it is possible to use the button "Restart" for this.
- A new scan can be made to check whether the previously transmitted values have been set correctly.
- Done.
